Prerequisites:
• You should be logged in to your server/VPS via ssh as root, or
• As the deploy user, you should use sudo to run the commands (just put sudo in front of the commands below), or
• As the deploy user, you should run sudo -s to get a root shell and then follow the procedure below
Change to the Apache vhost directory

Change to the directory where all vhost files are kept as default
Create a new vhost file and open it in an editor
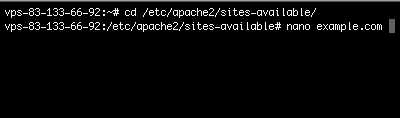
Use a simple editor like nano to create the new vhost file.
Define the vhost
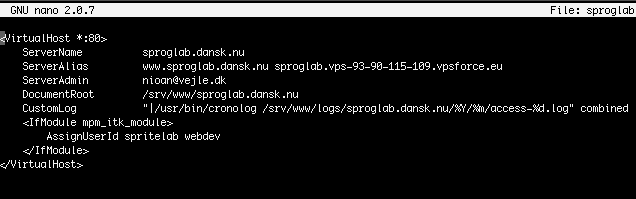
Once the vhost file is created and opened in the editor, add the above lines to define a vhost that catches requests to your domain. Enter the domainname as "Servername", and the www subdomain as your "ServerAlias." You can add several ServerAlias lines if you want to use more than one subdomain on the vhost, or add them to one ServerAlias line, separated by spaces.
Use the AssignUserId line to set the user and group that the site should run as.
Save the vhost file

Press CTRL+o and then press Enter to accept the filename.
Enable the vhost

Run a2ensite example.com to enable the vhost
Check the syntax of the Apache configuration

To ensure that the configuration is syntactically correct, run apache2ctl configtest
Reload Apache to make the site live

After reloading apache you can try to access the site in a webbrowser